
How to Cut a Birdsmouth for a Shed – No rocket science involved
This applies to a 10 ft span, the distance between the two exterior walls.
It doesn’t matter if your board is 8 ft, 10 ft, or 12 ft long; the method is exactly the same.
If you don’t have a cutting diagram yet, go back to the previous article. It walks you through how to use EpiphyX to generate one for your own project, whether that’s a house, a shed, or any similar structure.


Mark the Ridge End (plumb cut)
First, write down the numbers, it’s easier to follow along while reading than having to scroll back and forth.
Place your speed square on the top right corner of the rafter board, call this Point A.
From that corner, measure a distance equal to the Plumb Cut Length (in this example, 6 3/8″) along the top edge. This forms a small triangle; its short vertical side measures 3 5/16″.
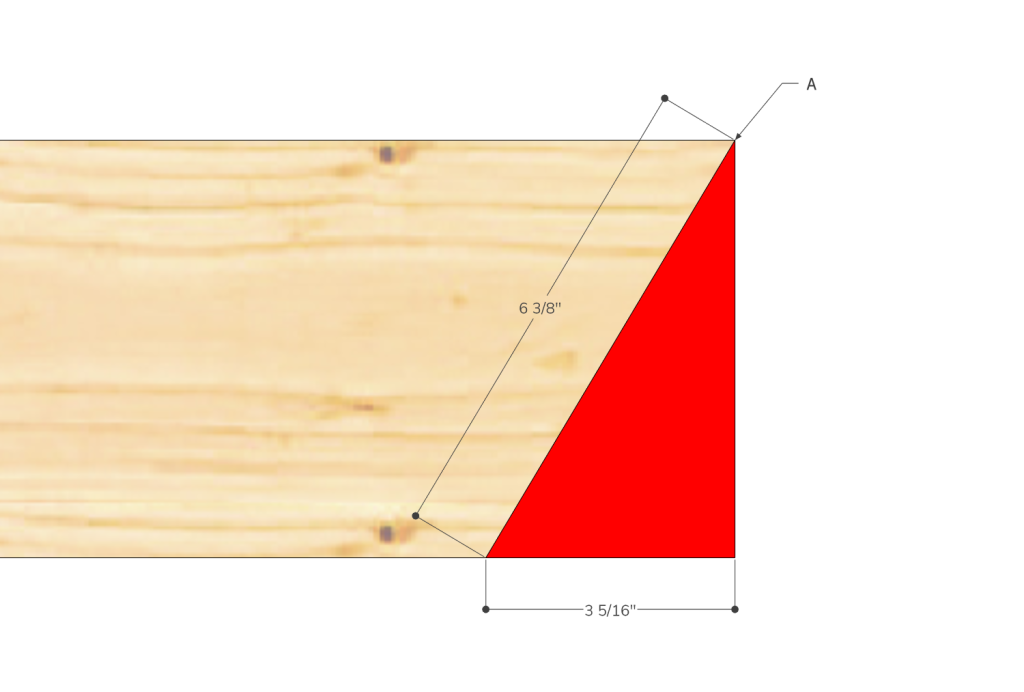
If that’s confusing, just measure 3 5/16″ up from the bottom edge, mark the point, and connect it to the top corner, it’s the same plumb line.
Draw the line with your pencil, that’s your ridge plumb cut.
The part outside this line (mark it with an X) is the waste you’ll cut off, it fits against the ridge board later.
Locate the Birdsmouth (where the rafter sits on the wall plate)
From Point A, measure a distance equal to the Rafter Length (including overhang), in this case 6′ 3 9/16″ for a 6″ overhang, or 6′ 10 1/2″ for a 12″ overhang — to the left and draw a square line across the board.
That’s Point B, just a reference mark.
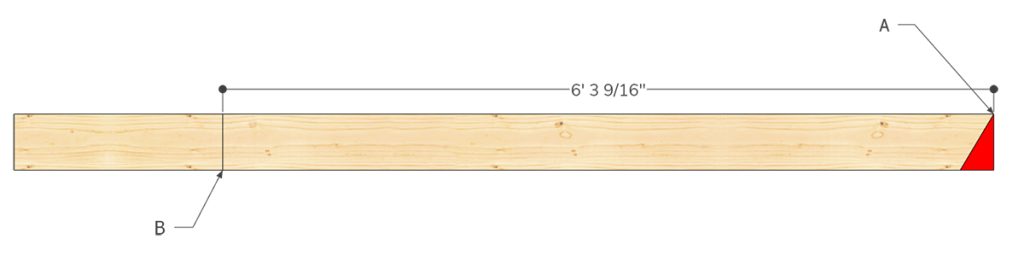
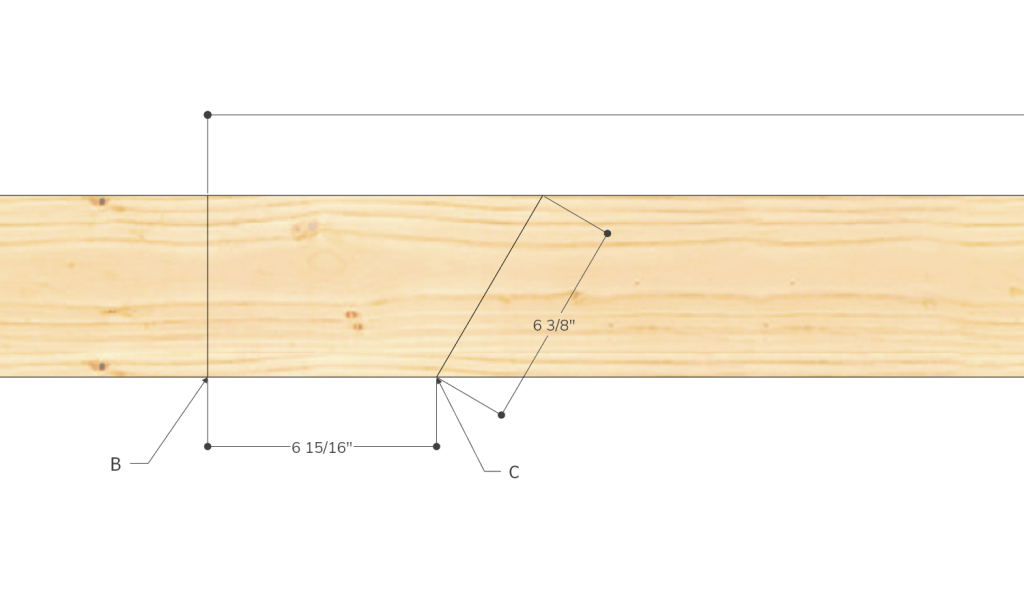
From Point B, measure a distance equal to the Tail Length, for example, 6 15/16″ for a 6″ overhang, or 1′ 1 7/8″ for a 12″ overhang, back toward the ridge, and mark Point C.
At C, rotate your speed square the same way as before and draw a 6 3/8″ line (your Plumb Cut Length from the result table).
This marks the heel cut, the vertical side of the birdsmouth.
Cut the Birdsmouth Notch
From Point C, measure 4 1/16″ to the right along the edge of the rafter and mark Point D.
This 4 1/16″ represents the hypotenuse of the small triangle formed by the heel cut and seat cut.
At D, draw another line parallel to the one at C, also 6 3/8″ long, this is the Plum Cut Length.
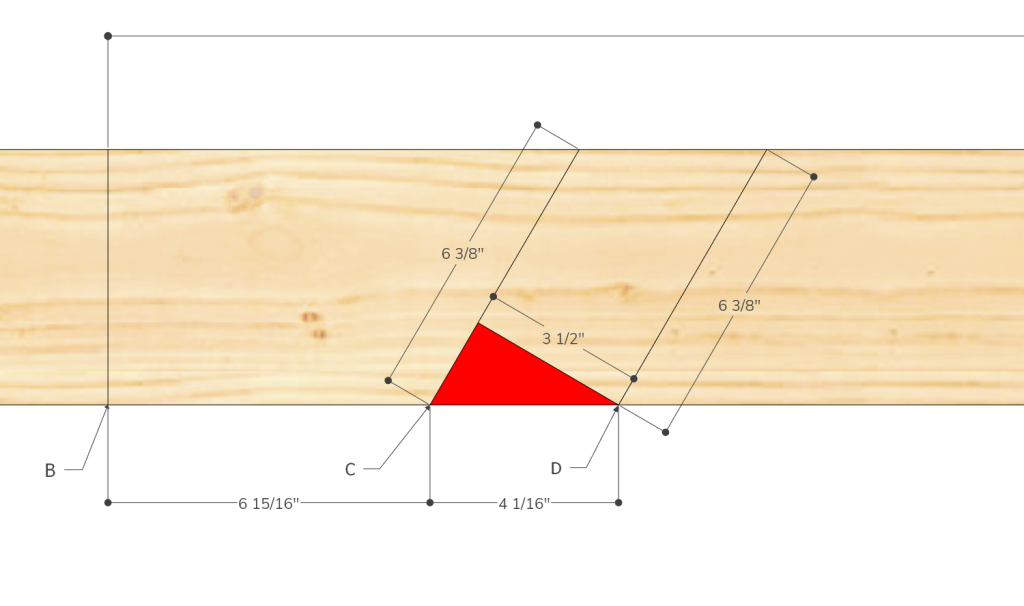
Now, from D, draw a vertical line straight down 3 1/2″ (the width of a standard 2×4 top plate), or 5 1/2″ if you’re sitting on a 2×6 top plate.
This bottom horizontal line is the seat cut of the birdsmouth.
The small red section between these lines (mark it with an X) is the material you’ll remove to form the birdsmouth notch.
Cut the Rafter Tail
At Point B, make your tail cut based on your soffit style:
Square Cut: for an open or angled soffit (soffit follows the roof slope). The sub fascia board is cut straight/square — no bevel or notch needed. The bottom edge aligns naturally with the sloped soffit. No modification required.
Drop: the sub fascia is positioned lower than the top of the rafter tails by a specific amount (the “drop” value). This creates room for the fascia board thickness so that when the fascia is nailed on, its top face sits flush with the top of the rafters — allowing sheathing or roofing to run cleanly over it. The drop = fascia board thickness (e.g., 1.5″ for 2× fascia, or 3/4″ for 1× fascia).
Flush: the sub fascia top sits flush/level with the top of the rafter tails. No drop, no bevel. This works when the fascia does not need to align with the roof plane — typically used when there’s no continuous roof sheathing running over the fascia, or when a flat soffit boxing is applied separately. A plumb cut (vertical cut at the rafter tail end) is typically used here.
Bevel: the top edge of the sub fascia is beveled (angled) to match the roof pitch. This means the fascia board can sit flush against the rafter tails along the full face, and the roof sheathing can run smoothly over the top without a gap. This is common in closed/horizontal soffit systems where the top of the fascia must align perfectly with the roof plane. The bevel angle = the roof pitch angle.
Summary Table
| Cut Type | Top of Sub Fascia | Use Case |
|---|---|---|
| Square Cut | Square/straight | Open/angled soffit following roof slope |
| Drop | Lowered by fascia thickness | Flush soffit; sheathing runs over fascia |
| Flush | Level with rafter top, no bevel | Flat soffit, no sheathing over fascia |
| Bevel | Angled to match roof pitch | Closed soffit; perfect roof plane alignment |
If you want to learn more about soffit details, check out my separate guide onsoffit installation and styles. Once you finish cutting the first rafter, place it in position to test-fit and make any small adjustments if needed.


